

Sunday, March 30, 2014
Ninjago Pillow Case
Wednesday, March 26, 2014
Kid Made: Earrings

My 6 year old daughter has been on a earring-making kick lately. Making earrings is a quick and gratifying way to get your crafty fix. My girl thinks it is the best when she can make a beautiful pair of earrings for her teacher, friend or Grammy. I love that she is using up random beads left from other projects. Once she puts the beads on the jewelry pin, I bend a loop and attach it to the hook. We made cards for them with scrapbook paper and now she has sweet gifts to give her favorite peeps!
Tuesday, March 25, 2014
Plaid + Sock Monkeys

I made these pajama pants for my youngest and I am pretty sure I need a pair myself! I originally used this plaid for an ear flap hat and had just enough left to squeeze out some pants. I love when that happens.

The pockets were courtesy of some scraps I had left from making my niece some pajama pants. These look so cute on the little bean, but right now he won't wear them because they are not footies. Sigh. I suppose they will get worn when the weather warms up a bit.
Friday, March 21, 2014
Feedsack Print Clothespin Bag

But wait! There's more! Here is the second clothespin bag I made. I happen to have a soft spot for 30's feed sack prints. Eventually (as in, don't hold your breath 'cause its gonna be a while) I am planning to finish a quilt for my daughter using feed sack prints. Until then, I can amuse myself by using them in projects that don't require as much time. I am kind of embarrassed at this point to bring to your attention the fact that I used rick rack...again! But hey, I can't quit it. This time at least I added eyelet lace. Does that count for anything?

Thursday, March 20, 2014
Cluck, cluck! It's a Chicken Clothespin Bag!

Too many months ago, a friend ordered a clothespin bag from me. I dug out a few scraps of this chicken fabric and squeezed the pieces out of it. Here's the problem: when I finished, I hung it up and fell in love with it. After all, it has chickens AND rick rack, so how can you go wrong? So here's the secret: I decided to keep it. Shhh!!! Merry Jo, if you are reading this, yours is just as lovely, I promise.

I rescued the pink rick rack from the bottom of my box (yes, I have a dedicated rick rack box, and it is FULL!). I had exactly the right amount, which makes me feel pretty darn smug.
Wednesday, March 19, 2014
Pillow Cover
I've been at odds with sewing for a while now and this is the first thing I've made in weeks (maybe months?). On a whim I decided to take some Amy Butler scraps and crank out a very quick pillow cover. You know when you buy new furniture and they give you the ugliest pillows ever made? Well, I've had a few of them stuffed in a closet for years and decided to give one a makeover today.
Considering that I'm not one for subtlety when it comes to colors (ex. I've got bright orange oil cloth on my kitchen table) I decided to just go for it with the prints and yellow piping. Quilting something was also on my bucket list for the year and I'm calling that task done. Cutting 7 pieces for this was plenty of tedium for me thank you very much (props to all you quilters out there!!). It's a temporary fix to spruce up my dear rocking chair but it'll do for now. It at least adds a pop of color to an otherwise very bland area.
 |
| The very, very ugly pillow before. |
 |
| The very, very funky pillow after. |
 |
| The back of the pillow cover with purty yeller flowers. |
 |
| I'm a sucker for piping! |
 |
| Ohhh yeahhhh. I "quilted" something! |
 |
| The pillow in it's natural habitat. Someday I will paint that rocking chair turquoise but for now this is as good as it's gonna get. |
Friday, March 14, 2014
Foodie Friday: Waffles!
It's Foodie Friday and I am going to take the lazy route and post a link to a recipe I tried this week: Waffles with Vanilla Custard. I happen to love cookbooks and I asked for Mennonite Girls Can Cook for my birthday last year. It is a beautiful cookbook full of interesting recipes, including the German/Mennonite recipes mom made us from her childhood. The recipe for Waffles with Vanilla Custard intrigued me, and I finally got around to trying it. I like it for two reasons: the waffles are very light and crispy without the extra step of beating egg whites and folding them in, and the custard is a very different and delicious way to top a waffle. It is basically like a thin, lightly sweetened pudding. My kids loved it!We had them for dinner with sweet potato fries and scrambled eggs. What about you? Are you a breakfast for dinner fan?
**The only modifications I made were to use coconut oil in the waffles, and I tweaked the sweetening just a bit. Next time I would use maple syrup or agave instead.**
**The only modifications I made were to use coconut oil in the waffles, and I tweaked the sweetening just a bit. Next time I would use maple syrup or agave instead.**
Wednesday, March 12, 2014
Mom's Bday - Another Inside Out Bag
I found this beautiful cotton duck batik on fabric.com a while back and knew it had to become a bag for my mother. I think they wove this print just for her (they just didn't know it). It is now the 4th time I've made this bag and in all likelihood, I'll probably make it many more times. It's the Inside Out Bag from over at The Purl Bee (see tutorial here). It's usually quick to sew, doesn't require a lot of yardage and really works with fun and funky prints.
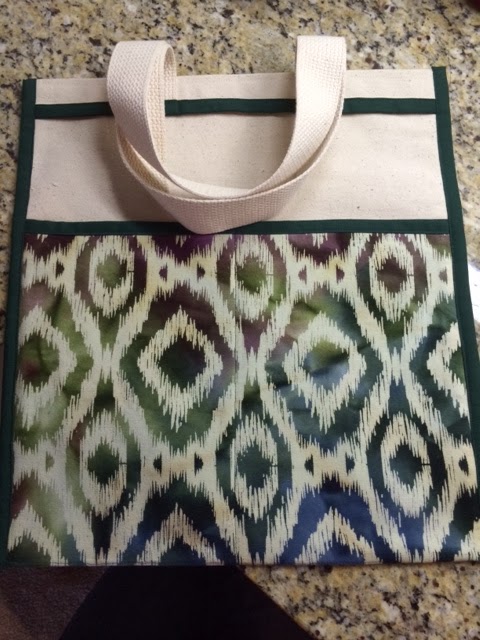
There are greens, blues, purples and pinks that all blend together in this print.

The body of the bag is made from a nice, heavy weight canvas and the straps are a heavier weight cotton webbing. I couldn't find any pre made bias tape that matched so I made my own out of a beautiful, deep, dark green cotton.

Tuesday, March 11, 2014
Drawing


Friday, March 7, 2014
Wild and Crazy 60's Bark Cloth Dress


Wednesday, March 5, 2014
DIY Snowglobe Ornaments

I had several projects planned around Christmas...but...didn't happen. This was one such project but I am happy to say they are finally done! My daughter and I made these together, one for each the kid.

We found the miniatures at the craft store before Christmas, along with a little package of bells, Christmas tree buttons and a bag of buffalo snow. The little birds are from the floral section.

Tuesday, March 4, 2014
Willow Wayfarers: Version #I Lost Count
If you sew for kids, especially those of the bean pole variety, you really should know about this pattern: Willow Wayfarers Slimsters for Hipsters. I have used this pattern so many times I have lost count. I bought it when my oldest was about 2 and I couldn't keep his pants from falling down. These pants have a slim fit, are fast to put together...and wonder of all wonders, you can bang out a pair of pants using your cast offs! Just cut an old pair of pants up the inner leg seam and lay both legs flat. If you're really tricky (and depending on the size of the pants) you can use the existing hem for the new pair. One less step! I also like the elastic method for these pants. It is sewn in so it won't roll.
 Alright, enough yammering on about the pattern. This version I made from my old corduroy pants and added some cute knee patches for good measure. I had to trick the kid into letting me take pictures of him as he is suddenly very anti-picture. He thought he was showing off the dinosaur he painted for Grammy while I was trying to get a decent shot of the pants. :)

Sunday, March 2, 2014
Mirror Makeover
Before Christmas, I found this mirror at the thrift store for $10.99. It is very well made, from Bombay Company and made in 1987 according to the tag.

 The mirror is beveled and easily removable which made this project a breeze. I was a good girl this time and sprayed on a thin layer of Zinzer primer first. That stuff is the best. I painted my kitchen backslash once using Zinzer and latex paint over it. Worked like a charm! After priming the mirror, I painted it emerald green.

 After the paint dried, I used the same technique I used with this frame. I painted black in all the crevices of the frame (very willy-nilly...this is not a situation that calls for precision). While the paint was wet, I took a damp washcloth and wiped most of it off, allowing the black paint to highlight the details.

 And there you have it! I plan to hang this funky thang in my living room one of these months. I have been itching to reconfigure my wall o' art & photos for the 19th time. Here is what the wall looked like about 3 iterations ago.
Subscribe to:
Posts (Atom)