Monday, December 30, 2013

Closet Flashback: Another Cabo Halter

Here's another rendition of the Cabo Halter by Amy Butler (see a different one here) that I made a few years ago. It's a chocolate brown Michael Miller print and is a really nice quality cotton. 


Here's the top in action while I hung out with my perro. Side note: he was recently nicknamed gordo oso and I think it fits.


This particular pattern is great for ladies like myself that have freakishly long torsos. When I raise my arms you don't see my belly button. I consider that a victory! 


It's a delicate pattern without being too dainty if that makes sense.


I used all princess seams again and an invisible zipper. Since I made this originally I've gotten a serger and an invisible zipper foot. I bet I could crank one of these out in an hour or less now!

Friday, December 27, 2013

Foodie Friday: Megan's Bean Salsa


I got this recipe from my sister (I'm classy and writing about the recipe I stole from her..lol) and have made it at least a million times over the last decade (ok so don't call the hyperbole police on me…it may not be quite a million times!). I make salsa my business because a) it's delicious b) it's nutritious but mostly c) it's because I could drink it straight outta the bowl and jarred salsa just isn't the same. When I get migas they have to bring me my own pitcher (yup a mini pitcher) in order to have enough fresh salsa to wash down my breakfast. It's just the way I roll I guess but with that in mind, I've carefully cultivated my salsa making skills with a few different recipes starting with this one. 

This is easy to make and a serious BBQ necessity. Heck, it's so good I even make it year round!

So anyway, here's the recipe in all it's glory:

1 can black beans (drained)
1 can cannellini beans (drained)
3 T chopped jalapeƱos (check the heat level…you may need more or less depending on how toasty you want the salsa to end up)
4-6 minced garlic cloves
3 T olive oil
1 TBS chili powder
1 TBS onion powder
2 tsp cumin
Cayenne pepper to taste
1 c frozen corn (I use the organic, sweet, white variety)
1 c diced onion (I like to use red onions but use whatever you prefer)
1 can diced tomatoes (or 2-3 large fresh diced tomatoes - I'm lazy so I always use a high quality canned variety)
3 TBS lime juice

Mix all ingredients and let rest in the refrigerator for at least an hour before serving. 

Monday, December 23, 2013

Closet Flashback: International Carpet Bag

I love this bag and always travel with it. It's the perfect size to carry on a plane and it sits nicely under the seat without having to vigorously kick or smash it to get it to fit. My mom made it for me a year or two ago so it's an extra special edition to my handmade wardrobe. She makes magic with her sewing machine so needless to say this bag is made to last! 


It's definitely a larger sized piece so I generally don't carry it for day to day activities. It's great as a weekender though!


This print always makes me want to travel even more.


If I remember correctly, I think my dad picked out these buttons. They are perfect!


The zipper tab is one of my favorite parts because it has my initial :)


Nice and roomy on the inside with a few little pockets to keep things tidy.


Friday, December 20, 2013

Foodie Friday: Basic Gnocchi

What are gnocchi exactly? They are heavenly pillows of soft, light, potato goodness that showcase whatever sauce you throw their way. When done right they are quite a treat and well worth the effort. 

Basic Gnocchi  (adapted from a William Sonoma recipe)


**First of all, make sure you have everything gathered and ready to go. These come together pretty quickly once the potatoes happen so it's better to be prepared!**

Ingredients:
4 large Russet potatoes
2 eggs, lightly beaten
1 tsp salt
1/2 tsp nutmeg (grate your own…fresh is soooo much better)
1/4 tsp white pepper (I've also used fine black)
2 1/2 c all purpose flour (plus a little extra for rolling)


Boil potatoes until fork soft and peel immediately (to make peeling easier you can use a kitchen towel to hold the hot spuds while you take the skin off). Then put through the medium or small disk of a food mill or potato ricer.


(This is what it looks like after the food mill…yay…uniform taters!)


Mound the milled tubers on a lightly floured surface and make a well in the center. Pour eggs, salt, pepper and nutmeg into the well.


Sprinkle 1 c of the flour over the potatoes and using a fork or those little things on your hands called "fingers" and gradually blend the eggs, potato and flour together (adding more flour as needed) to form a firm but moist dough. It's critical here to not overwork the dough and should take about 5 minutes. If you overwork the dough they will be like dense, doughy potato pellets (like the ones you get in the freezer section at the grocery store)…and that's just gross. 


Now divide your dough into 6 equal pieces.


Roll each chunk of dough into 3/4 inch thick ropes. You can also flour the surface lightly when/if the dough gets too sticky.


Now my favorite part! Cut each rope into about 1" pieces. Using your thumb, tines of a fork or a beautiful gnocchi board (like I used in the above picture) GENTLY roll each piece to give them the signature grooves that hold all the lovely sauce you're about to put them in.

To cook your little lovelies, toss them in boiling water for about 4-6 minutes until they float to the top (you may need to cook them in batches). Drain and toss with your sauce of choice. I like a good old fashioned marinara with a generous sprinkling of cheese or tossed in a little browned sage butter. DELICIOUS!


Monday, December 16, 2013

Closet Flashback: Easy Vogue 8469 - Version 3

This is by far my favorite version of this dress (you can see the pink one here and the black polka dot one here). It's actually made out of a curtain panel that I got from Target on a crazy discount. It's a lightweight cotton and is fully lined. 

I redrafted the back of the dress to make a deep V and I love how that detail worked out.


I also lowered the neckline a little.


I like that this dress has a fitted, high waist.


Cowboy boots go with everything.


The fabric was very, very thin. It's lined with a lightweight muslin.


My obsession with the invisible zipper can be seen here! 


I had forgotten that I had done all princess seams for this dress. It made me very thankful for my serger.

Friday, December 13, 2013

Foodie Friday: Corn Starch Pudding

This is an old family recipe that always reminds me of my childhood. It probably should be called vanilla-almond pudding but we'll stick with the name we know. There is no picture because it's white pudding which isn't the most interesting food model! 

1/4 c sugar (I use organic cane sugar)
2 TBS corn starch *see note
1/4 tsp salt
1 egg 
2 c milk *see note
1 TBS butter 
1 1/2 tsp pure vanilla
Almond flavoring to taste

Mix sugar, corn starch, salt and egg very thoroughly. Over low heat, gradually add the milk until completely smooth. Stir frequently almost to the point of never stopping until the mixture boils. Boil stirring furiously for 1 minute longer. Remove from heat and add the butter and vanilla. Divide into small portions and pass around the almond flavoring for people to add to their taste. 

*I've used rice milk and soy milk as substitutes. Soy turns out better than the rice milk and if you use either add 1+ TBS additional corn starch to help thicken.  Also, I've used stevia as a substitute for the sugar and have been told the flavor turned out great.  


Wednesday, December 11, 2013

Colette Patterns: My First Hazel Dress

I had so much fun making this dress. It was just one of those projects that came together beautifully and didn't require any adjustments, fussing or seam ripping! I cut my regular size for the bodice but used the size 18 for the skirt to give it extra fullness. I've seen other people around the internet use the same technique and I definitely prefer the way the skirt hangs with the extra fabric vs. cutting your regular size. 


The skirt has pockets too! 


This was an interesting project for me because I think it might be the first dress that I've ever made that has been totally unlined…gasp…even if a project doesn't call for lining I usually neurotically do it anyway. 


I had fun sewing in my "Straight from my Stash" label that I got from Etsy.


I got my money's worth outta my serger on this project…this dress has officially almost been serged to death!


I learned a new technique for finishing off an invisible zipper using a facing. Very cool. The folks over at Colette Patterns really put some nice touches on this design.


Narrow hem…and serged seams...YAY!


This is just a shot of the skirt and bodice detail. I bought the pattern just for the V design in the front. 

I already have the material for two more versions on the way from fabric.com. I absolutely LOVE the way it turned out and it's a fun bonus that this fabric matches my fedora. I actually bought the fabric from G-Street before I moved to Texas. It was on the clearance table for $2 a yard. I love when things come together like that!

My one qualm with this pattern is the darts…I may just need to get my ham out again and take them to task.   As of now though, they kind of, sort of make things look a bit like an 80s Madonna flashback if you catch my drift. 


Monday, December 9, 2013

Closet Flashback: Pink Easy Vogue 8469

If I remember correctly, this was the second dress I ever made. It's made out of a cotton shirting fabric with pink, purple and white stripes. I've worn it a lot over the last few years and it fits me perfectly. There are simple gathered details along the waist and bust line which give it shape. 


 The shoes are a light pink pump from Aldo and go perfectly with the dress.


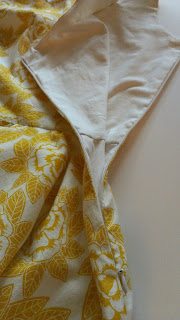
Check out the side lapped zipper. That was probably one of the last ones I ever installed before becoming an invisible zipper convert.


I like looking inside old garments that I've made to see how far my skills have come as a seamstress. This one has some unfinished seams and some that are finished with a zigzag. 


 I've made this dress 3 times because it fits me so perfectly straight off the pattern.  I posted about a different version here and you'll be seeing my favorite version in a few weeks!   

Friday, December 6, 2013

Foodie Friday: Lime Chicken Tacos

I came across the base recipe for this many, many years ago and tweaked it to my specifications. It's a minimal effort, maximum flavor situation and has endless possibilities.


*These are topped with queso and extra cilantro

Ingredients:

  • 1 1/2 lbs shredded chicken (I use all natural/organic breasts or a whole chicken) 
  • 3 T lime juice
  • 1 T chili powder
  • 1 C frozen corn (I use organic because all the GMO stuff freaks me out)
  • 1 C chunky salsa or more (I like to use mesquite or chipotle salsa but use whatever you prefer)
  • 1/4 C chopped cilantro (I use A LOT more because I loooooovvvvvvveeeeee it!)
  • Tortillas (I usually use whole wheat) 

To Prepare:

Put chicken in crock pot and cook until done. Remove and let cool slightly. Drain any fat from the crock pot, shred chicken and return to crock pot. Add remaining ingredients and cook covered in crock pot until warmed through. If the mixture seems too dry add more salsa.

Serving suggestions: 

Top with more cilantro, shredded cheese, queso, sour cream, Greek yogurt, refried beans, black beans, chopped jalapeƱos or rice.

Wednesday, December 4, 2013

The Yellow Rose of Texas Dress - Butterick Retro Pattern 5748


Way back in October I posted about attempting a hand picked zipper for this dress (original post here). The sad part is that I finished this project in August or September and never got around to writing about it. Oops! So to remedy that, I put on my boots this morning and finally took some pictures.                                             

The dress itself is pretty straight forward to sew. It had some finicky details that if unlike me, you use sturdy fabric, won't actually be a problem (e.g. the notched detail along the front and back neckline and the inset side zipper). In my case, I used a light weight quilting cotton and had to reinforce the neckline details and waist to keep things from falling apart. 


Here is the invisible side zip instead of an inset lapped zip.


Bust darts on the bodice.


Be warned: this dress takes 8 yards of fabric if you fully line it. That also means hemming 2 almost full circle skirts for what will feel like days.


Here is the neckline detail. I'm not happy with how it flops over all the time but it's my fault for picking a thin fabric and not thinking through how that would impact the final structure. Another lesson learned.


Despite the little quirks that this dress has, I do love it!


This dress is so girlie and twirls like a dream (although, I'm getting to old for spinning apparently. I spun a couple of times for this picture and almost fell over…lol). When I wear it I feel like I should be doing the Texas two step or line dancing with my fella.


I never know where to look for these types of shots. I always end up looking kind of silly. Oh well, you get the idea.


This is definitely the fullest skirt I've ever had. It's so fun to wear and someday it would be fun to get a crinoline to push it over the edge!

I think I would make this again but I wouldn't add the neckline details OR line the skirt. That would save me a lot of time and potential aggravation :)


Monday, December 2, 2013

Closet Flashback: A Melange of Houndstooth

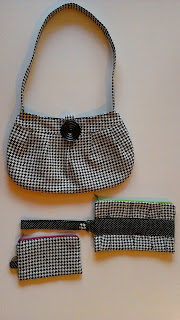
A few years ago I bought several yards of this vintage houndstooth fabric that I found stashed in the back of a retro furniture store in Austin on S. Congress. I didn't have the guts to cut big pieces out of it at first so I went on a tiny bag rampage and made this matching set. I realize now that when you start to look at all that houndstooth print together it begins to feel a lot like an optical illusion. If necessary, look away and blink a few times in between pictures! 

Anyway, these are all easy, quick projects that require very little time or materials.
   

This is the gathered clutch by Noodlehead and you can get the tutorial for free HERE.


This is the lil cutie pouch by Noodlehead which you can get the tutorial for HERE


Last but not least, is this Buttercup bag that I made using the Made by Rae pattern HERE.


This is just a close up of the cool vintage-looking button that I found and the little pleat details that give this bag it's shape.


This may have been the first button I ever covered. I was so proud of myself!


I used different colored zippers just for fun.  If you fear the zip, these projects are a great, low pressure, way to familiarize yourself with installing them.


I probably made these 2 or more years ago and just recently unearthed them at the bottom of another bag. I find that extra pouches/purses/bags become like nesting dolls and never seem to end when you start digging!