Saturday, December 31, 2011

Bakery Box


To complete the bakery set, my son and I made a bakery box. He got bored with this project after about 3 minutes, so I ended up making it mostly myself. I had a sturdy hinged box which we covered in fabric and hot glued the edges on the inside. Then we lined it with scrapbook paper and trimmed it with rickrack. The window of the box is two layers of contact paper, sticky sides together. I am not sure how long it will last, but the gift was a huge hit, and has gotten a lot of use already!

Saturday, December 17, 2011

Party Dress Butterick 5603


This dress was made using a vintage repro pattern (Butterick 5603). I made option B but left the ties off. The fabric is a polyester shantung from JoAnns. This dress is very fitted and I wish I had made a size up. I think from now on that is what I am going to do. Its easier to take things in anyway. The one issue I had with the pattern was that the front of the straps kind of gape a little. I think that if I had added the ties, that would have made the difference. Also, the neck line is low. I added some conveniently placed fabric flowers to cover things up a little, and I am happy with how it turned out. To make the flowers, I cut strips of fabric in various lengths and widths. I folded them in half lengthwise, wrong sides together, and ran a gathering stitch down the raw edge. I gathered the strip and then formed the flower. I tacked them down on interfacing and then cut away as much as I could. That gave them a nice sturdy backing, and allowed me lay arrange them on the dress to see if I liked them before sewing them on.

Tuesday, December 13, 2011

Gifts Kids Can Make (With A Little Help): Native American Pouch

My daughter helped me make this pouch for her brother for Christmas. He is interested in anything related to the Old West, including Indians. To make the pouch, I cut the pieces from a piece of faux suede I have. My little girl helped me sew it up (her first real project!) and we then cut the flap into fringe...much easier than cutting it before and trying to keep the pieces out of the seams. We added a leather drawstring with a wooden bead pull. My daughter threaded pony beads onto the fringe and I tied knots to keep the beads on.

Monday, December 12, 2011

Ruffled Cuff

First of all, Nikia, if you are reading this.....STOP! :)


OK, now that we have that out of the way....I made this cuff for my sister-in-law for Christmas. I have been wanting to make this pattern for quite some time. Now I must make one for myself. While it isn't the quickest pattern in the world, it wasn't that difficult to do...just tedious. (Wait! Does that even make sense?) The beads are actually a dark purple, but it doesn't really show up in the picture.The buttons are from my stash o' vintage buttons.


Monday, December 5, 2011

Gifts Kids Can Make: Candy Cane Reindeer

I think we've all received at least one of these things during elementary school years. I actually forgot all about them til recently when I was looking for activities to do with the kids, in lieu of advent calendar treats. All you need is a candy cane, a bit of ribbon or string, a bell, a small red pompom and some googly eyes. We attached ours using a low-temp glue gun. Yes, I let my kids use a low temp glue gun. The glue is hot but not scorching, and they do fine with it. (I also think in this application, low temp is better because it won't melt the plastic wrapper.)

Sunday, December 4, 2011

Gifts Kids Can Make: Play Cake Stand


This project is super low-tech and very easy, not to mention cheap! I got the the plates and bowls at Walmart, $1 for two plates or bowls. Apply E6000 glue to the bottom edge of the bowl. Glue to the bottom of the plate. Let dry and voila! You have a cute cake stand to display your pretend bakery goodies.

Saturday, December 3, 2011

New Techniques

A little while ago I posted about a sewing class that I'd signed up for. I highly recommend spending the money for it even if you don't like the dress that's being made.  It's loaded with techniques like thread tracing, hand stitching, making a muslin, altering for your size, etc.  As you can see, I am still in the muslin phase which has been labor intensive but satisfying. I've used hand stitching and machine stitching on the muslin and am getting eager to be far enough along to try it on. Regardless of how this dress turns out (although it will be awesome!) I have a whole new appreciation for haute couture sewing. Even if I only use one technique per garment here on out, it will be so worth it!


Thursday, December 1, 2011

Gifts Kids Can Make: Pretend Bakery Treats

This year, I am having the kids make Christmas gifts for each other. About once a week, someone gets to stay up 'late' from their nap and do a little stealthy crafting. I will be posting the projects as we do them. 

When I saw Frugal Family Fun blog's posts about sock donuts and sponge cake, I knew that would be perfect for my son to make my daughter. The donuts are made by cutting the toe off a dollar store men's dress sock. I flipped mine inside out so the 'nice side' would be out. Roll up the sock, smoothing as you go. When you roll the heel it will seem like it is too messy, but keep going. The top of the sock covers any lumpiness you may have. Hot glue the top of the sock down, cover with felt frosting and puff paint sprinkles. The sponge cake was made using a multipack of sponges from the dollar store. I couldn't find the ones with the colored scrubbing layer, so we used felt for the frosting instead. My son cut the sponges himself and decorated them using puff paint. We added pompom 'cherries' to the top of a few, just for fun. The total cost of this project was $3, and I think she is going to love it!

Friday, November 25, 2011

Huckle Cat

Huckle is finished! Here are the stats, if you are a sewing geek. :) I drafted the pattern myself using my trusty roll of medical tissue, you know...the stuff they cover the exam tables with. Its awesome for making or tracing patterns. For this project, I used wool felt which makes a world of difference! It is so nice to cut and sew with, and doesn't seem like it will pill like Lowly already is. His shirt is made from an old pair of jeans. The pants are corduroy and I made them using an infant bloomers pattern as a base. I basically only used the crotch curve from the pattern. Otherwise, they had to be made more narrow, longer, and a lot lower in the rise. In lieu of stuffing, I bought a $2.50 pillow from Walmart and cut it open. If you have checked the price of stuffing lately, you will know that this is a lot cheaper. For the face details, I used a dry brush with yellow, orange and red fabric paint.The facial features are stitched on with black thread, as I wanted to replicate the idea that he is a drawing from a book. I also used exposed seams with black thread for the arms and legs. I also made sure that his clothes are permanently attached so they don't get lost! :)

Wednesday, November 16, 2011

Owl Shirt


This shirt was made for my littlest boy as a Christmas gift (thus the reason he is not modeling it now). I found the fabric at fabric.com and couldn't resist it. The pattern was horrendous and I will not be using it again. I'd tell you all the pattern number but I threw it in the trash already. The facings don't line up by a long shot and the collar had to be tweaked to even fit on the shirt. Oh, well. The kid's two years old. He won't be complaining! I will, however, be ironing it before I give it to him, because I do have some self-respect! :)

Tuesday, November 15, 2011

Another Jewelry Roll by Mom

Mom has churned out another perfectly sewn jewelry roll. This one is also made of lovely vegetable fabric from Obi's in Lancaster county.

Monday, November 14, 2011

DIY Lowly Worm Doll

The Making of Lowly Worm

Ready to conquer the world, or at least Busytown!
My son loves Richard Scarry books, especially Lowly Worm and Huckle. I am going to make him Lowly and Huckle for Christmas. I've got one down, one to go. Lowly is made from felt (note to self: next time use wool felt) and various scrap materials. My husband contributed a length of electrical wiring (something pretty thick...it has three copper wires inside a plastic sheath) to make Lowly pose-able. Of course, letting a two year old run around with electrical wiring is not exactly advisable so I had to make it safe. (Well, the big cheeses somewhere would probably declare him unsafe for anyone under the age of 21, but I don't really care. I declare him kid-friendly!) I used duct tape to cover the ends of the wire and then sewed a little channel into a chunk of repurposed fleece blanket. After putting the cable in there, I rolled the fleece up very tightly and whip-stitched it closed. After scalping some stuffing from my son's dilapidated stick horse (shhh...don't tell him!!!) to stuff Lowly's foot, I carefully slid the fleece thingamajig into the felt body. I added some more stuffing for his head, embroidered his mouth and sewed on vintage buttons for his eyes. His hat is felt and complete with a feather from our very own chickens!

Monday, November 7, 2011

Saved Necklace

This is not a spectacular project from scratch. I bought this necklace and loved it but the string snapped after I wore it a few times.  It sat in my fix it pile for a year and I finally dug it out yesterday to make it wearable again.  After restringing it 3 times (the string snapped the first 2 times) and taking an extra trip to the craft store for a more sturdy medium (tiger wire), I got the thing finished.  I added the heart toggle clasp and am so glad I can wear it to work this week! I took beading classes when I was younger and it was fun to work back into it a little.  My sister-in-law actually made me a really beautiful beaded bracelet recently which inspired me to revisit this necklace again.  I think I could really get back into this type of crafting again... 


Sunday, November 6, 2011

Christmas and Random Projects Coming Up

It may seem like I've disappeared.  Quite to the contrary actually.  I've been quietly and furiously crafting and mending things in my spare time.  The problem has been that my last three projects have all failed leaving me with nothing to post.  Sometimes that happens and it's really annoying. A necklace I was repurposing broke right as the last beads were about to be strung, a dress I was making wouldn't gather properly no matter how many times I ripped out the seams and lovingly tried to fix it and a top I was making just plain old didn't come together as planned. So to regroup, I've started gathering together a list of simple and beautiful projects for Christmas decorating and a few just because they're interesting. This year I've decided to go all out with the Christmas stuff because it's the first year ever that we've really been "home".

http://rhgarza.blogspot.com/2011/10/hoopla.html - Emroidery hoop storage
 http://www.cutoutandkeep.net/projects/hanger-coats - Hanger covers
http://www.creativeinchicago.com/2011/07/diy-rope-vases.html - Rope Vases
http://2littlehooligans.blogspot.com/2011/08/round-nesting-baskets-tutorial.html - Round Nesting Baskets
http://anwjohnston.blogspot.com/2011/10/diy-no-sew-ruffle-christmas-tree-skirt.html - Ruffled Tree Skirt
http://howaboutorange.blogspot.com/2009/10/make-gift-bow-from-magazine-page.html - Magazine Gift Bows
http://knittygrittythoughts.typepad.com/knitty_gritty_thoughts/2009/11/my-entry.html - Pinecone Ball Ornaments
http://www.dsquilts.com/fabric_and_patterns.asp?PageID=214 - Christmas Stockings

Wednesday, November 2, 2011

Sew Mama Sew Handmade Holidays

If you haven't already, check out the Sew Mama Sew blog. Every day this month they are doing their Handmade Holidays series, where they post tons of tutorials for gifts of all kinds. It is worth checking out!

Tuesday, November 1, 2011

More With Amy Butler Fabric

Several months ago, I bought a kitchen table at the thrift shop. It happened to come with 4 new chairs that, while still covered in plastic, must have dropped out of the back of the truck since they are a little dinged up. The chair cushions were covered in a cream-colored upholstery fabric, just perfect for three small children. Not! As you can see on the left, it didn't take long for the chairs to take on a somewhat 'weathered' look. I browsed on fabric.com (my new fav place to fabric shop) and found some Amy Butler laminated cotton. I almost went for a more conservative print, then I figured I might as well go big, or go home. I spend all this time thinking I want more color in my house, so now I have some in my kitchen. The project was easy enough, just remove the seat, stretch the new fabric tightly around and staple it down. The laminated cotton is so nice because it can be wiped clean very easily. Yay!

Wednesday, October 26, 2011

Jewelry Roll

Here is a project that Mom just finished. It is a jewelry roll for traveling. The center roll has a button closure for holding rings. The fabric is from our favorite Lancaster county fabric store, Obi's. They have a whole section of beautiful fruit and veggie prints like this one.

Monday, October 24, 2011

Its An Amy Butler Explosion!


I have spent enough time drooling over Amy Butler fabrics and decided it was time to actually buy some. I originally ordered 1 1/2 yards of this to make myself a skirt. I changed my mind and put it to use to change up the scenery in my living room. You all are probably tired of seeing these silhouettes by now, but they are quite easy and satisfying to change up. To adhere the silhouettes, I used this nasty no-sew fusible that I have no other use for. I say nasty because the stuff is a) stiff, b) doesn't hold up through the wash, and c) don't dare sew with it or your machine will get all sorts of gummed up. Despite my animosity toward the poor roll of fusible webbing, it does work for this quite nicely. I can iron them on, slap them in the frame, and peel them off and repeat for the next background fabric. This is the third change so far and they are holding up nicely. I will post my other Amy Butler fabric project later this week.

Sunday, October 23, 2011

Skirt McCalls 5523


I went to JoAnns a few weeks ago and saw this wool-blend tweed (?) that I just loved. It is a deep plum-y purple. I don't normally buy fabric without a pattern in mind, but this time I made an exception. I decided to use McCalls 5523 to sew up a skirt. The pattern has 4 different options for the lower back panel, included pleats, ruffles and flounces. I made the option for the 'shaped lower flounce.' I am very happy with how it turned out. I will be making this pattern again, with a few adjustments. First, seems to run small (even by following the measurements on the envelope) and fortunately I had cut a size up just in case. I also want to try the different back options, as I think the flounce isn't all that noticeable. However, that might be the fabric I used.

Saturday, October 22, 2011

Big Jeans to Skinnies


I have a stack of jeans in my closet that are a couple of sizes too big but they are basically new.  I didn't know what to do with them and I didn't want to get rid of them.  I just got some winter boots and needed jeans that would fit tucked into them so I decided to try to modify the legs.  Incidently, right as I decided to try this I ran into this awesome tutorial about changing regular pants into skinnies (the easy way). I never intended to wear them alone but I liked how they turned out so much that I've actually worn them several times already! I'll be doing this to at least one more pair so next time I'll post a before and after.

Tuesday, October 18, 2011

A Real Live Coat! McCalls 5525


I've never made a coat for myself. In fact, I've only ever made one coat before this and it met its demise when a certain someone put crayons in the dryer. I must say that making a coat isn't as mystical and scary as it sounds. The pattern calls for 3+ yards of fabric, and I didn't want to spend a lot until I had tried the pattern out. After much hemming and hawing...ha!! get it...hemming?!...I decided to use this raspberry pick corduroy that I got at JoAnns for a whopping $2 a yard. I have been hoarding it for a while, knowing that it would come in handy. I figured (hoped!) that the addition of black piping and buttons would keep it from becoming too obnoxiously pink. The lining is just a black quilting cotton with white polka dots. The buttons are my favorite part. I was originally going to use self-covered buttons with the polka dot fabric. They were cute, but then I saw these buttons. I spent more for the buttons than the fabric! Still, the coat cost just 20 bucks to make. The pattern went together nicely and I even figured out the lining technique they used. The only thing I would do differently if I make it again would be to enlarge the pockets and move them up a little.

Sunday, October 9, 2011

Basic PJ Pants


I haven't had the opportunity to sew much lately but I needed the satisfaction of a finished project. I just stocked up on some nice cotton prints so I made these super easy, cuffed PJ pants :) They're burnt orange with tiny, white flowers and after some minor pattern alterations, they fit perfectly! I think I'm going to whip up a few more pairs of these as the season gets cooler...maybe in some flannel with a drawstring?

Sunday, October 2, 2011

Sewing Class

I haven't posted since the beginning of August.  No, I didn't fall into a pit or anything but after vacation, things certainly went in a direction I didn't anticipate. As soon as we got back, I started interviewing and going through all of the ensuing responsibilities that go with that adventure. I then started grad school and got a job.  Incidently, I started my new job and grad school in the same week...realized my brain would break if I tried fitting it all in like that so withdrew from grad school for the semester.  That brings me to now...about to hit my 4th week on the new job, boring pants hemming projects behind me, ready to actually start sewing again. 

I knew I had the mental margin to create again the other day when I was standing at the shredder daydreaming about the next dress I could make.  It was perfect timing then that G-Street fabric ran an awesome Groupon deal...hooray! Anyway, I digress. Since I dropped my classes I felt a little sad that I wouldn't be in a classroom anymore so I decided to look for a sewing class to take.  I've really been wanting to learn more about couture technique and tayloring and I happen to love 1950s and 1960s style (Hello Madmen!) and I ran across an online class that teaches you how to make a classic, sarong-style/fitted bodice bombshell dress.  I knew who the teacher was already because I read her 
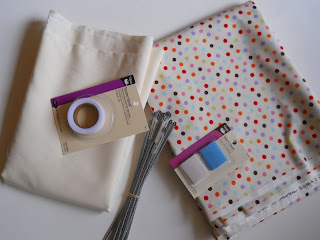
blog and it made my day to find out that she had come out with an online class. I've never really delved into using boning or making crazy adjustments so I am really excited to get going on this course.  The fabric I chose is a multi-colored polka dot on cream by Moda and I even have red pumps to match! When the dress is done, all I'll need is a big beehive hairdo and some cat eyes to match :) 

Friday, September 30, 2011

Reusable Snack Bags

I inherited a few scraps of oil cloth from Rachel's dopp kit. I knew exactly what I wanted to make out of it: reusable snack bags. Since the snack goes inside the pouch (duh!) I wanted the inside to be easily wiped down, but also wanted the pattern on the outside. I cut two pieces per pouch, zigzagged them together with right sides out. Then, I stitched up the sides (and added velcro somewhere along the way). So far, they are working out nicely. I keep one in my son's backpack with a few wet wipes in it so he can clean his hands after snack time at school. I just might have to make more of these.

Tuesday, September 20, 2011

Birthday Bunting

The Birthday Bunting Modeled By Dad

Last week I made a bunting to hang up for the kids' birthdays. I was able to use up a lot of scraps I had laying around, and I ended up with enough flags to sew up another bunting. This turned out to be a very easy project, perfect for learning how to use my new (to me) sewing machine.


Sunday, September 11, 2011

For The Princess


Here is the dress I made for my daughter for her birthday. After a fruitless search for a pattern that I liked, I found this tutorial online. I knew I had to make it! I had just enough princess fabric to make it work. The dress is the size 5 and I used 1 1/2 yards. I'm amazed that you can make a dress as flouncy as this with so little fabric! I am really thrilled with the way it turned out, and so is she, except that she wants the flower in front to be pink and not blue/green. Time for a lesson in complimentary color! :) The only thing I would change about the pattern is the width of the bodice. Its a bit too wide for my girl, so if I make it again I will take it in.


The back: this is what sold me on the dress!


The skirt has four ruffled tiers


The flower in question


Ruffle Closeup


Ta-Dah!!


Perfect for twirling!

Wednesday, September 7, 2011

A Dress: Simplicity 2886


Here is a dress I actually finished about a month or so ago. It's taken me all this time to get pictures of it, but I have worn it a few times. A sweet friend of mine, Linda, sent me a Joanns card for my birthday. I decided that I was going to make something just for me! :) I did the whole inner-debate-in-the-fabric-aisle about where or not this fabric was too obnoxious. Obviously, I decided to get it. I knew I would be adding a black waistband and piping. The waistband is pleated? Tucked? I can never remember what its called. I added the piping and left off the sash that was called for. I am happy with the results, although I have to get used to the feel of the dress, because it makes me feel like I am wearing a six person tent! :)

Wednesday, August 31, 2011

A Real Live Project!!!!

My son started Kindergarten yesterday. A month or so ago, he informed me that he wanted me to make him a backpack. Now I think by now you have figured out that I love to sew, but there are certain things that I don't bother with, because they are cheaper/easier to just buy it. A backpack is a good example. This little beauty cost me as much as a new Lands End backpack, and my sewing machine decided to give up and die mid-project. However, when my son who I love asks me to make him not just any backpack, but a horse backpack, I said fine. The green fabric is an outdoor canvas from JoAnn's and the lining is a farm print that I picked up in Lancaster. I wanted the backpack to look as 'normal' as possible, as in something that didn't scream 'Hey, look, my mom got a sewing machine for Christmas and she just taught herself how to sew on my backpack!!!!' Since there is a lack of decent backpack patterns on the market (at least in my opinion) I drafted my own. I think this project would have been really enjoyable if my sewing machine hadn't been gasping for its dying breath, but I ended up finishing it off on Mom's machine. (thanks!!) I think if I made it again it would go a lot quicker.