Tuesday, June 29, 2010

July = Dress Month

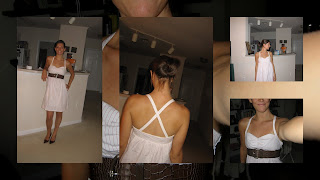
We decided to have a sewing challenge each month in addition to our Christmas present challenge. July is kicking everything off with dresses. It's hot outside so what better to do than create attire that keeps us cooler! I'm a little early, but I just finished the Maryy dress from BurdaStyle.com and you can get the free pattern here.

This is an easy, breezy summer dress with a gathered bust and flowy, full skirt. I thought that the unbelted skirt made me look like a giant, white, puffball so I tightened everything up with a brown belt (which doesn't really match but you get the idea). I do like the pattern but next time I would use a fabric that drapes softly and I would add invisible pockets and belt loops. I used cotton fabric with some stretch to make this dress and I successfully installed my first invisible zipper!

Monday, June 28, 2010

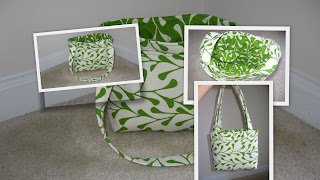
Behold, the blueberry bag!

Yes? No?


I'm on the fence about this dress. I'm not a huge fan. I tried shirring (sewing with elastic thread in the bobbin). I really like the technique. However, I am not sold on this dress because it bunches out at her armpits and I think the straps are a little wide. I think it'll fit her better as she grows so we'll see.

Friday, June 25, 2010

Christmas Is Only 182 Days Away

This year, we aspire to make all our Christmas gifts, or at least most of them. To that end, we would like to complete at least one Christmas gift each month from now until December. Stay tuned for our creations, and join in the fun! Email us pictures and we'll put them up on the blog.

Thursday, June 24, 2010

Passport Sleeve


I had some really interesting scraps in my collection and I wanted to fancy up my passport a little so I found this lovely and simple tutorial from a super crafty lady in Australia. I love how it turned out and it was really easy. Start to finish, it took less than half an hour to sew up :) Now my passsport can gather dust in style!

Fun Shopping Bag


I have still not taken the plunge into reusable shopping bags, mainly because I never remember them when I go to the store. However, we have joined a CSA this year and that requires a lot of bags. I found this tutorial and had to make it. I am going to make one for each of the kids and they can use them to help me carry our vegetables. I used the tutorial here. A few notes: I made a slightly bigger bag than she did with fairly lightweight fabric. I increased the triangle size to 6.5" and it is still pretty snug. Next time, I think I will use a 7.5" or even 8" square. Next up, a blueberry bag!

Tuesday, June 22, 2010

The Successful Failure Bag

The Sophia Bag was a nightmare. The pattern and directions are clear and easy enough and in theory this could be a really wonderful bag. However, I had technical difficulties with the interfacing. I used a quilting weight fabric which requires 3 layers of fusible interfacing. That should've been my clue to NOT use quilting weight fabric. Anyway, that many layers caused a lot of issues and despite my best efforts and some name calling, I just could not get everything to fuse properly which I found out after the bag was mostly sewn together when the interfacing started to bubble and peel off of the fabric...very frustrating after hours of cutting and carefully pressing! Obviously, the bag looked terrible so I decided to redesign with what salvageable materials were left. The end result is a simple tote that is the perfect size for my
purposes and I feel vindicated because precious materials did not go to waste.I say that this project is a successful failure not only because I was able to remake the Sophia into something useable, but also because I successfully installed the zipper into the original project. This is a HUGE feat for me since I have major zipper anxiety! I just decided to grit my teeth and confront the little devil and I did it :)


Monday, June 21, 2010

Pillowcases


Did you know you can make things out of pillowcases? Rachel made this purse. You can make pillowcase dresses. I was surprised to find that you can even make a whole outfit out of a pair of pillowcases! I got these while visiting my Grandma in Florida at the resale shop at Penney Farms for a whopping 50 cents. First, I attempted to make a shirred top, which was cute until one of the rows of shirring came out. I scrapped that idea, cut the shirring off and used the remaining pieces to make a top and capris. The top is from One Yard Wonders. The capris are a modified version of the Willow Wayfarers pattern I love so much. I used the existing hem for the pants, and the ruffle on the shirt. Pardon the out-of-focus crazy pictures, but she was not cooperating at all.

Another Skirt


Here's another skirt I made for myself and have yet to post. The pattern was from a book I found at the library called Twinkle Sews. I really like the look of the skirt, but I do have two things to say about it. First, the yardage listed in the book was off, so if you make it, but extra fabric! Second, while I love the ruched waistband, it needs to have a little more shape (unless you are shaped like a brick). I keep debating whether I'll try to modify it or not. Also, the question is, what kind of shirt do I wear with this without covering up the waistband?? Any ideas?


A Skirt


Here is a skirt I just finished. I am proud to say that I installed the zipper myself. Score one for me! (However, I may admit defeat on the current dress I am working on and coerce Mom to do it :)

Quick and EASY Project (Seriously!)


Supplies:

E6000 glue (or other hefty glue)
Cheap colored hair clips
Buttons
Pliers

Choose your buttons. If they have a shank, cut it off with your pliers. Glue button to hair clip. See, I told you it was easy. I am going to be making a bunch of these for Christmas (or her birthday.)

Old Window


Several years ago I hit the jackpot. Someone was tearing all the windows out of their very old carriage house (I think that's what it was). I took 5 or 6 of the windows and have had them ever since. One of them I had hanging on the wall for a while. I have always wanted to do cool things with these windows but was never quite sure what. I got the idea of using a poster print for the background. The photo I used is sentimental because it is looking out of the barn at the farm where my Mom grew up. To make it I cut a piece of mat board slightly smaller than the back of the window. I positioned the poster and the mat board and used an electric staple gun to tack it all down. I added two screw eyes and some hanging wire to the top back.

Dresser Makeover


This dresser has had many lives already. Previously, it was Rachel's dresser. When Rachel got it, she and Mom painted it burgundy and applied textured wall paper to the front of the drawers. (Thanks for doing the hard part for me!) After Rachel was done with it I decided to take it for my daughter's room. I painted it 'circus' purple as Dad refers to it. The drawers I just painted white. Instant makeover! (Wouldn't it be awesome if I remember to take a 'before' picture next time??)

What to do, what to do?

I am not a floor-to-ceiling pictures type of person. However, I love pictures and I (incidentally) have the three cutest kids in the world ;) That makes it hard to narrow things down. I wanted a way to hang up more pictures without the wall looking too cluttered. Oh, and I didn't want to spend an arm and a leg on new picture frames. Eureka! I had an idea. I raided the frames I already had, stole some from Mom, and went to the dollar store where I bought about 10 frames for...you guessed it, about $10. Then I went and got myself a nice can of matte black spray paint and went to town. I painted all the frames the same black. Let me tell you, a cheesy dollar store frame looks a LOT nicer with a coat of spray paint. Case in point:

After painting all the frames I laid them out on the floor how I wanted them and took a picture of the arrangement on my digital camera. I printed out the picture to use a guide for hanging them up. In case you are wondering, the square frame at the top is going to be a clock. I am in the process of embroidering a drawing James made, which I will use along with the guts of our living room clock to make myself a shiny new clock. So now I have a new picture arrangement. I plan on switching out pictures as I feel like it, and I can even add more frames in needed.

Thursday, June 17, 2010

Sewing Machine Cover


My sewing machine needed a hat and I have a surplus of felt so I figured I could use that to my advantage. This project is VERY loosely based on a project in One Yard Wonders but instead of adding an outside pocket, I designed some flowers and added some fun buttons. The top corners are squared and since it's made of felt no hemming was required. This was an extremely easy project and if I hadn't added hand-stitching it would've taken less than half an hour. Yeah for quick projects!

Tuesday, June 15, 2010

Very Simple


I made a bulletin board this morning. So easy I feel like it was cheating, but hey, sometimes I need a project that can be finished quick. I very loosely followed directions from One Yard Wonders for this one. Basically, you can take apart a frame. I found a roll of cork on clearance at Lowes for $3. The frame was from a fill-a-bag-for-a-dollar yard sale. I cut the cork the same size as the frame back, using spray glue to adhere it to the back. I added a second layer to make sure the cork was thick enough. Cover with fabric, put back in the frame and voila! Instant bulletin board! I am planning on making push pins with some of my vintage buttons. If I do I'll post pictures.

Monday, June 14, 2010

Amy Butler - The Sophia Carry All


My sewing slump is officially over. After a few days of reflection and mental regrouping, I've come back from the project dark side. To start off my crafting rejuvenation, I decided to once again embark on a lengthy Amy Butler project - The Sophia bag. This purse is actually what made me want to sew in the first place. I happened upon Butler's website one day and feasted my eyes on this bag. That was about a year ago and since then I've sewn at least five other Butler patterns including the infamous Weekender Bag. This purse is going together MUCH easier than the Weekender and is so fun to make! I have to say that Amy Butler patterns are like my kryptonite. I get weak in the knees and go into creativity overload when I see one but I suppose there are worse vices than sewing projects :) Anyway, I will post a picture of the bag as soon as it's finished which (after I procure more interfacing) shouldn't take long!

Wednesday, June 9, 2010

Bag of Awesomeness


For my 30th birthday (that's still sinking in...), Rachel made me the most awesome bag ever. It is totally lined, quilted and contains patches of some of her favorite fabrics. I cannot begin to tell you how great this bag is and how much I love it. She made it for me to bring out into my garden to pick stuff, but its so darn pretty I just don't know if I can do that. However, I have decided that it is a perfect take-to-the-CSA bag, where I can fill it up with vegetables without getting it too dirty. Thanks, Rach! I love it!

Bonus points for anyone who can guess what vegetable is in the bag :)

Crafty?


Rachel was harassing me about needing to post, but I haven't done any sewing since we got back from vacation. While that problem is being remedied, here is a somewhat crafty project I did accomplish. The kids and I picked strawberries yesterday, and during their naps I was able to make nine half-pints of Strawberry Rhubarb Jam with Honey. Mmmmm.

Monday, June 7, 2010

Sewing Slump

Unfortunately, not all projects work out as planned. In fact, my last three projects have not worked out as intended. It all started with the red strapless dress on the right. It was going well, I even learned how to properly install a kick pleat/vent which was fun. The problem is that it doesn't fit. Even if I ripped out the seams (which I loathe doing), the size chart for the pattern is so off that no amount of tweaking would make this baby fit me in a flattering way. The second project, the bag on the left, was supposed to be a replacement for one of my deteriorating reusable grocery bags. For some reason, I just did not look forward to sewing the bag. Maybe it is because it was a project out of necessity or because I didn't like the fabric, I don't know but I was rather remiss in my preparation and sewing of the pieces. Needless to say, this bag was doomed from the start and didn't come together with accuracy or attention to detail. The project was abandoned at the lining in part due to my lackluster effort and in part because the bag turned out to be unwieldy in size. The third project, the blue polka dot dress is kind of a Frankenstein-esque type of endeavor. I used a tutorial to make a highwaisted, full skirt and attached a simple halter bodice. I can't count this project as a complete loss because it was a near success. The highwaisted skirt part fit well but the bodice part missed the mark. I may be able to salvage the blue dress by ripping off the bodice and finishing it as a cute, full skirt. The other 2 projects will eventually be repurposed once I stop wanting to throw my sewing machine off my balcony!