Showing posts with label easy. Show all posts

Wednesday, May 21, 2014

The Super Tote: School Edition

Last October I made my first version of the Super Tote by Anna Graham (check her shop out over at Noodlehead). The Whale Super Tote has seen some major action over the last 8 months and has performed so beautifully that I decided to make myself a new version to use as my school bag since I'm going back after a long hiatus.

I had a really nice, heavy weight canvas in my stash as well as a single yard of the writing print. As soon as I started to cut everything out I knew that piping needed to be involved...and then that evolved into needing 4 colors of piping. My sister is addicted to Ric Rac and I just can't quit piping. We are suckers for adding extra detail and flair.

Anyway, what you can't see in the picture is that the canvas is subtly quilted (I used Soft & Natural...my favorite!) to give even more detail along with the pops of color that match the colors on the lining fabric. I realize that the colors are slightly reminiscent of the 80s and make me think of waterfall bangs and stacked socks but what the heck, I'm a child of that era so it works!

Some projects are just fun to sew and this is definitely one of them. It's one of those patterns with clear instructions and well marked pattern pieces that ends with consistent results.  I absolutely LOVE this bag and can't wait to use it. It also definitely got me out of my sewing funk so hopefully more finished projects will be coming soon!

This is the front of the bag and has a pocket

This is the back of the bag...the pink piping is vintage!

This is the inside...there's a small pocket and elastic for my Bento or water bottle. 

Front pocket

The recessed zipper is definitely one of my favorite features of this bag.

The pictures make the bag look wrinkled...it's really not. 

Monday, April 7, 2014

Another Take on Matting Pictures

The other day I got trapped inside by these dark, angry clouds. 


The thunder was booming and the rain started pouring so I decided that while I was relegated to the indoors I'd do something sort of productive. After living in my apartment for a year, I still have some bare walls that annoy me every time I see them. We're not planning on being in this place for much longer so I didn't want to invest in anything fancy BUT I needed a quick fix to fill the void. Here's my cheap and quick solution.


First, I gathered all my supplies: cutting mat, rotary cutter, pencil, ruler, craft paper, X-Acto knives, old frames/mats and pictures. 


The original mats that are already in the frames were 8x10 so on the back of the craft paper I measured and cut that size out. I was using 4x6 and 4x4 pictures so I measured those sizes on the back of the cut craft paper in the location that I wanted them to be. I then measured 1/8 in from the picture measurements so that once the squares were cut out the pictures would have something to be anchored too. I carefully cut the corners out with the X-Acto and did the straight lines with the rotary.


Then I taped the pictures to the back of the craft paper, slapped the mat and pic back into the frame and voila 6 new "mats" for under $2. 


This is the craft paper I used. 


Here are a couple of finished frames. As you can see, I'm clearly one for subtly of theme and color. HA! 

As a side note, I've seen other tutorials for covering the actual chipboard but I wanted the cheapest and laziest possible solution. I think I nailed it!   


Wednesday, March 19, 2014

Pillow Cover

I've been at odds with sewing for a while now and this is the first thing I've made in weeks (maybe months?). On a whim I decided to take some Amy Butler scraps and crank out a very quick pillow cover. You know when you buy new furniture and they give you the ugliest pillows ever made? Well, I've had a few of them stuffed in a closet for years and decided to give one a makeover today.

Considering that I'm not one for subtlety when it comes to colors (ex. I've got bright orange oil cloth on my kitchen table) I decided to just go for it with the prints and yellow piping. Quilting something was also on my bucket list for the year and I'm calling that task done. Cutting 7 pieces for this was plenty of tedium for me thank you very much (props to all you quilters out there!!).  It's a temporary fix to spruce up my dear rocking chair but it'll do for now. It at least adds a pop of color to an otherwise very bland area.
The very, very ugly pillow before.
The very, very funky pillow after.
The back of the pillow cover with purty yeller flowers.
I'm a sucker for piping!
Ohhh yeahhhh. I "quilted" something!
The pillow in it's natural habitat. Someday I will paint that rocking chair turquoise but for now this is as good as it's gonna get. 

Wednesday, March 12, 2014

Mom's Bday - Another Inside Out Bag

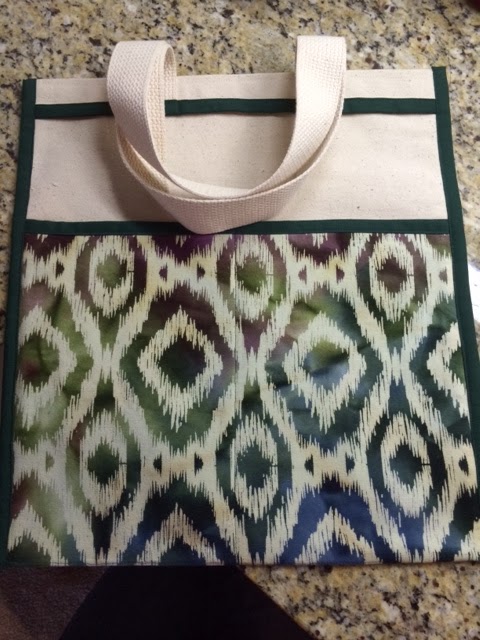
I found this beautiful cotton duck batik on fabric.com a while back and knew it had to become a bag for my mother. I think they wove this print just for her (they just didn't know it). It is now the 4th time I've made this bag and in all likelihood, I'll probably make it many more times. It's the Inside Out Bag from over at The Purl Bee (see tutorial here). It's usually quick to sew, doesn't require a lot of yardage and really works with fun and funky prints.


There are greens, blues, purples and pinks that all blend together in this print.


The body of the bag is made from a nice, heavy weight canvas and the straps are a heavier weight cotton webbing. I couldn't find any pre made bias tape that matched so I made my own out of a beautiful, deep, dark green cotton.


Sunday, February 23, 2014

Colette Patterns: My Second Hazel Dress

I have quite a stash of Colette Patterns and I'm happy to say that I now have two successful, completed projects under my belt. For this particular version I used a busy but really beautiful Amy Butler print (If I remember correctly it's from the Lark line?) It's a blue print that's on egg shell with hints of red, orange, turquoise and yellow. I love it. I do. I really do. It's from the Hazel pattern again which sews up quickly and is actually really fun to sew. The first time I wore this dress my sweet husband actually though it was from Anthropologie which is a huge compliment considering that it is my favorite non-workout clothes store!


The entire dress features serged seams.


I used an invisible zipper of course:) 


The dress is NOT lined...which for me is a big deal. 


However, no lining = nice and light for Texas!


I took extra time to work on lining up the fabric pattern for this dress.


This pattern turns into a comfortable, versatile, warm weather friendly dress. It's a wonderful and easy pattern for everyone. If you haven't bought it yet, do so. It's flattering and fun!!!! Just do it :)

Wednesday, February 19, 2014

Homemade Reed Diffuser

I've been reeeeaaalllyyy burnt out on sewing lately. It happens sometimes and when it does I cover my machine and play nicely with other crafts. I've always wanted a reed diffuser but can't stand the nasty, synthetic perfumes that go with store bought ones. I loosely followed THIS tutorial to make my own. 

Basically, you just need to use a 3:1 ratio of filtered water to rubbing alcohol. Then mix in 20+ drops of your essential oil of choice. Throw in bamboo skewers (I used ones I had laying around for grilling) and you're done. Some people get fancy and add citrus peels, cinnamon sticks, etc. but I just stuck with a 30+ drop mix of orange and lavender essential oil. I also just used an empty kombucha bottle and wrapped it with oil cloth because I was too lazy to fight with the sticky glue that refused to peel off with the label. 

Now the room smells delicious without any funky, fake chemicals masquerading as air freshener. Another win for simple DIY.  


Friday, February 7, 2014

Foodie Friday: Homemade Coconut Butter


I have several recipes that call for coconut butter that I've been itching to try. However, I couldn't justify spending $15 on a jar when I'd never tried it before. Thanks to the internet I was able to find out that it's preposterously easy to make at home for a whole lot less. Here's my take on the procedure and I'm going to loosely call it a recipe even though it's kind of cheating to call it that. Anyway, here you go...

Ingredients:
12 oz of unsweetened, finely shredded coconut

Yield:
About 1 1/2 cups

These measurements are just for reference. You can increase/decrease based on what your needs are. Anyway, take your shredded coconut and throw it into your blender. I started low and gradually increased the speed as I scraped the coconut flakes back into the flow of the blade. You need to keep an eye on it and keep shoveling the flakes down or it can get stuck. Eventually you'll start to see the flakes get oily and then smooth out into the butter. It's like magic...scrumptious, coconutty magic. Anyway, keep blending until it reaches the consistency you want. FYI - I didn't make mine perfectly smooth because I like the texture. Then, hide all the spoons because it's ridiculously delicious. I literally kept eating it out of the jar, then mixed with vanilla, then on Paleo pumpkin pancakes...In fact, I can't stop eating it at all!!

So some notes for the road...
  • I have a Vitamix so the whole process start to finish took less than 5 minutes. From things I've read around the web, other blenders work but it takes a lot longer to smooth out the flakes.
  • I got my coconut flakes from Amazon. They came in a pack of 4 -12oz bags for under $15. I realize that 12 oz only churns out 1 1/2 cups BUT I like having the option to do other things with my other 36oz of shredded coconut. Maybe that's just me? 
  • One more thing...when you initially blend, it will be a smooth and creamy liquid. However, leave it on a counter for the night and it turns into a hard mass. Don't despair! The oils solidify and all you need to do is scrape out what you need and pop it into the microwave for a couple of seconds. 

Monday, January 27, 2014

Closet Flashback: The Cosmo Bag

Yikes….I already made this bag 3 years ago (original post here). This is yet another pattern that I sewed up while on a serious Amy Butler bender a few years back. It's interfaced with fusible fleece because i wanted a soft, squishy bag that I could throw in the back of my closet and not worry about getting permanent interfacing creases.


It's held up well and has been used a lot. It serves as a nice overnight bag or farmers market type bag.


It has pockets on both sides that are the perfect size for a bottle of water.


There are several pleat details that help shape the top.


I added a few little pockets on the inside. It's actually pretty cavernous so having a cell phone pocket was necessary. Please pardon the fuzzies at the bottom of the bag. I clearly need to spend some time with a lint roller.


This is one of those projects that while I really like the fabric and button combinations, I can't help but stare at my lines of stitching. I must've been in a frenzy because they lack let's say, my usual attention to detail. Oh well…just don't look too close ;)


I would definitely make this bag again IF I needed another huge bag. I've mentioned this before but my bag collection has turned into a Russian nesting doll situation. I kid you not…when I found this in my closet and dumped out the contents there were literally 15 OTHER bags of varying size inside. 

Friday, January 24, 2014

Foodie Friday: Spaghetti Squash "Hash Browns"

I absolutely love a good hash brown. My Dad makes the best ones in the entire world…seriously, they're legendary.  However, white potatoes and I are having a bit of a falling out and it's very rare that I eat them in any form (**full disclosure: although sometimes I eat Whataburger fries with spicy ketchup…it's shameful, I know :)**). Anyway, I digress. I've been crushing pretty hard on spaghetti squash lately and had some leftover in my fridge. I was feeling nostalgic for my Padre's cooking this morning and decided to try to make faux-browns with squash. It may sound a little weird but it was actually pretty darn delicious.


Spaghetti Squash "Hash Browns" - serves 2

2-3 c cooked spaghetti squash threads
1 TBS organic coconut oil or ghee
1 TBS organic coconut flour
1 egg
1 TBS+ dried basil
1-2 tsp garlic powder
1 tsp onion powder
red pepper flakes - to taste…I use A LOT
1/2 - 1 tsp fresh black pepper
Pinch of sea salt

Heat the coconut oil in a large skillet over medium heat. While the oil is warming, mix all the other ingredients together. Once the oil is hot enough, throw the squash mixture into the skillet and cook stirring occasionally to make sure nothing burns and so that everything is cooked and takes on a lovely golden brown color. This only took 5ish minutes FYI. Once they are browned to your liking, EAT THEM!  

PS - I'd like to clarify something too…while these do brown, they don't get that nice crunchy, crust that potato hash browns do. So now you know.

Sunday, January 5, 2014

Christmas Gift #2

As I mentioned last week, this was not my year for handmade gift giving. This is the only other thing I sewed for Christmas (well sort of, check us out on Instagram to see the monogrammed tea towel that made it under the tree too!). I love how simple this bag is to put together and how fun it is to pick fabric and trim options. I gave this to my sister who squealed a little so I think that's a good thing :) 


This is based on the Inside Out Bag tutorial from the Purl Bee. 

Wednesday, January 1, 2014

Christmas Gift #1

This year was so busy that I sewed precisely two Christmas gifts and both of them were from the Purl Bee tutorial for the Inside Out Bag.  This one I made for my Mawmaw using a heavy weight canvas and Amy Butler print. I made one for myself here that's almost identical which I have used more than almost any other thing I've ever made. If you're looking for a simple, practical and quick project this one's for you!


Monday, December 30, 2013

Closet Flashback: Another Cabo Halter

Here's another rendition of the Cabo Halter by Amy Butler (see a different one here) that I made a few years ago. It's a chocolate brown Michael Miller print and is a really nice quality cotton. 


Here's the top in action while I hung out with my perro. Side note: he was recently nicknamed gordo oso and I think it fits.


This particular pattern is great for ladies like myself that have freakishly long torsos. When I raise my arms you don't see my belly button. I consider that a victory! 


It's a delicate pattern without being too dainty if that makes sense.


I used all princess seams again and an invisible zipper. Since I made this originally I've gotten a serger and an invisible zipper foot. I bet I could crank one of these out in an hour or less now!

Monday, December 16, 2013

Closet Flashback: Easy Vogue 8469 - Version 3

This is by far my favorite version of this dress (you can see the pink one here and the black polka dot one here). It's actually made out of a curtain panel that I got from Target on a crazy discount. It's a lightweight cotton and is fully lined. 

I redrafted the back of the dress to make a deep V and I love how that detail worked out.


I also lowered the neckline a little.


I like that this dress has a fitted, high waist.


Cowboy boots go with everything.


The fabric was very, very thin. It's lined with a lightweight muslin.


My obsession with the invisible zipper can be seen here! 


I had forgotten that I had done all princess seams for this dress. It made me very thankful for my serger.