
Thursday, March 31, 2011
Wednesday, March 30, 2011
Barn Window Project

Several years back, I hit the jackpot. (I suppose it depends on your perspective, but...:) I found a whole pile of really old windows on the curb. Around these parts, trash picking is a big past time. If its on the curb, its fair game. Although the curb in question was a on a busy road, I couldn't resist. I think I was with Mom, and we frantically packed window after window into the van. At some point, the owner of the place came out and told us that they were original windows from one of the farm buildings out back, the house being very old. (1700's if I remember correctly) We have since moved once or twice and I have carted a few of the windows with me, with my husband cheering all the way. OK. Maybe not that last part. Anyhow, long story short, I decided that redoing my son's room in a farm theme was the perfect occasion for a window! I added two hooks to the bottom, so he can hang his stuff there. Two of the panes were missing, so I hung a horse shoe and a cowboy ornament in those openings. In the other panes, I attached 5 by 7 prints to the outside of the glass so I could easily change them. I might regret that later, but since it is hanging in the room of boys, we had to make sure it could withstand Armageddon, or at least a monkey or two trying to repel from the hooks. Not that my kids would ever try such a thing! :) What I am trying to say is that that bad boy ain't coming off the wall unless its moving time, and certainly not to switch out pictures now and again! I am really happy with the way it came out, and it renews my desire to use up every single window I have in the attic.
Tuesday, March 29, 2011
Reusable Snack Bag Tutorial with French Seams
I don't like using plastic bags for everything so I finally decided to make my own reusable bags to try out. I used a heavier weight quilting cotton but you could also use ripstop nylon or oil cloth depending on how messy your snack is. You can make them in any size you need too and since these are cotton they can be easily washed.
TO START: Cut 1 - 15 x 7 piece of fabric


 Now you're done and can flip the bag right side out and stuff it with your favorite snack :)
  P.S. You could also add velcro or a button if you want Fort Knox secure snack storage!
 Friday, March 25, 2011
Mitered Corner Table Runners


 I used some of my Marimekko scraps to add some color to my dining room. It was the first time I used the mitered corner technique and I used this tutorial from the blog "No Big Dill" and it worked perfectly and I will definitely be using this technique again. I will be putting a plain white cloth under the runner on my table to give it a cleaner and more finished look.
 Wednesday, March 23, 2011
Blue Cords

 Here is the latest pair of pants I 'upcycled' from an old pair of corduroy pants. These are a bit long, obviously, but the good news is they'll fit for a while.
Monday, March 21, 2011
Take Two

Here is the second version of the same pattern (Simplicity 2828). This dress was made with a seersucker print I found at JoAnns a while back for only $1 a yard. I hit the jackpot that day, and bought several of these prints for my daughter. This time, I used a pink lace (from Grandma) for the neckline, and a zipper in the back. My daughter likes both dresses, and she took several minutes deciding which one to put on and prance around in.
Simplicity 2828: I'm In Love!

Several months ago, I bought a girls dress pattern, Simplicity 2828. I've had it in my to-do list ever since. My goal for the next month or two is to sew through my stash! I would like to use up what I have so I can have a little more space. The fabric for this dress was from the clearance section at JoAnns, which I've had also for several months. It was about $1.50 a yard. The trim was also from my stash...two sizes of yellow rick rack (!) and some vintage yellow buttons. The buttons are square shaped and have a little braided border around them. The pattern is awesome!! If you are a beginning sewer, this pattern would be great. Because of the pleats in front and back, there is no gathering to do. The whole pattern is a total of three pieces (there are also 'Designer Additions' you can add too if you're feeling crazy). The pattern calls for a zipper but I did buttons instead, only because I love buttons and I wanted to add a little extra yellow to the dress. Even though my daughter is a size 3T, I made the 5T size. It worked perfectly, because it will be long enough for a while, but the arm holes are not too baggy and the top fits nice. The lining is from a sheet I found at the thrift store a while ago. When it was all said and done, I had used up several things from my stash, and my daughter ended up with a new dress. I'm already working on a second one....
Sunday, March 20, 2011
Pants Into Pants
 My husband finally gave up on my favorite pair of his dress pants. At 6'4", he has a hard time finding pants long enough. These ones were just a little short and drove him crazy. So, I cut them up! I used the Willow Wayfarers pattern yet again. Seriously, I can't say enough about this pattern. It fits my skinny kids perfectly! I think I have made about 20 pairs from it so far. That's $4 well spent. For these pants, once I split the leg seam apart, I laid them flat and lined the bottom of the pattern along the already hemmed edge, thus saving myself a step. Now the little gremlin has a pair of dress pants, even if all he wants to do is go outside and play:
Saturday, March 19, 2011
Marimekko Fabric
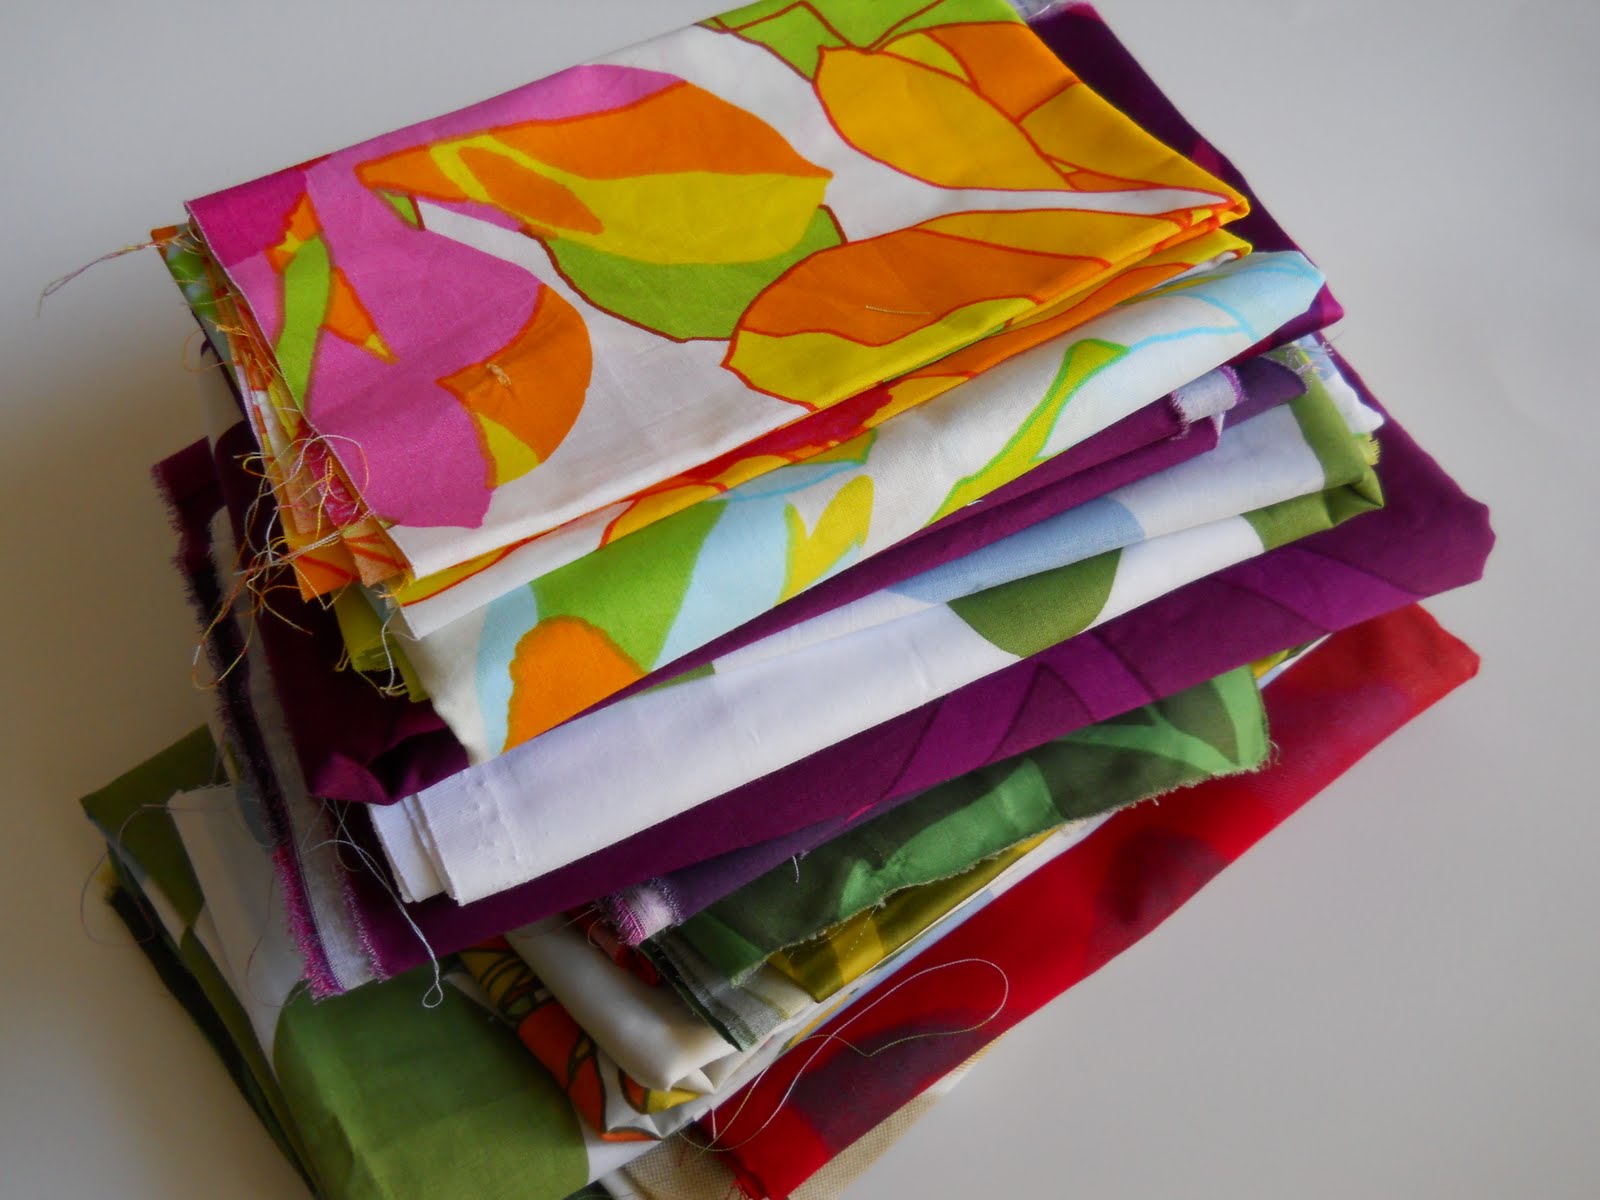


I have a Crate and Barrel outlet near my house which has proven repeatedly to be a dangerous thing for me. One day though, I discovered that some of the outlet locations sell yardage of the Marimekko designs that are exclusive decoration for the regular retail stores. This means that beautiful (and often funky) fabric from Marimekko that usually starts around $35 a yard is on sale for $4.95 a yard. That is awesome but it gets even better...they sell the remnants for .95 cents a pound. Yes, I said .95 cents a pound. This stack was 5lbs and cost me $4.99 and includes smaller pieces and some pieces that are so big I could make a dress or skirt or placemats or purse linings or whatever. The fabric changes by the season too so there's always a reason to keep going back :) So if you ever get a chance, check out Crate and Barrel for their crazy fabric deals!!!
Friday, March 18, 2011
Easy Pillow Covers from Ikea Fabric
 From time to time, I need to change up my pillow covers. They are so easy and quick to make and they can change the whole look of a room for almost nothing. Spring is almost here and I wanted to add some color to my living room (and add some life to my dilapidated couch that has seen too many flights of stairs). I've had this panel of Ikea fabric for over a year now and wasn't sure what to do with it until now. With the help of a little ivory piping, the end result is two wild and funky pillows that make me laugh every time I see them :) As a bonus, my husband likes them too!

Wednesday, March 16, 2011
Yeehaw!!


Here it is...the western shirt that has consumed all of my crafty time for the last week or two. Lately, we've been reading a book called The Home Ranch by Ralph Moody. I think at this point in time the series is probably pretty obscure, but it is so fun to read! In the series, Ralph (known as 'Little Britches') tells the tales of his childhood in the early 1900's, growing up ranching in Colorado. Little Britches had a knack for getting himself into a pinch, but also for getting himself back out (usually). Little Britches gained his moniker by doing trick riding at the Littleton Rodeo, at the age of 9 or 10. He could stop his horse on a dime, launching himself out of the saddle to flip through the air and land, on his feet, next to his horse. (He didn't enlighten his mother on this hobby of his until the actual rodeo.) Reading this book got me thinking that I could make my son a fancy Western shirt. After seeing the Once Upon A Thread series at No Big Dill (where you sew something themed on a children's book), I knew I had to make it, and make it NOW! I already had a pattern for it, which I had previously used for a vest. (Simplicity 5366) The fabric was a shirting fabric I found on fabric.com for less than two bucks a yard. It went together very nicely despite the fact that I lost the entire second page of instructions. My previous experience didn't quite cut it when it came to making the stand collar, so Google to the rescue! I embroidered the back yoke prior to cutting the piece out. For the design, I modified a clipart image for the horse and rider, and sketched out his name in lieu of a lasso. The buttons are pearl snaps, of course! I am really thrilled with how this project came out, if you can't tell. :) I have never made a dress shirt of the male persuasion and so I got to learn a few new things! And the best part? My son loves it. He even got right out of his warm, comfy jammies early this morning to get dressed up in his new shirt, jeans, cowboy boots and his favorite hat. That is success!
Saturday, March 12, 2011
Oh, Boy!


I just discovered the concept of 'digital scrap booking.' (Yes, I live under a rock) Being an anti-Photoshop traditionalist*, I wouldn't have pegged myself as a digital scrapbooker. Yet after I read this tutorial, I think this may be my new way of doing things. I really love to scrapbook, and I am not an expensive, fancy schmancy scrapbooker. However, there are a few other pursuits I like more that scrapbooking, like sewing and gardening. Thus the reason that I have piles of photos languishing in my childrens' boxes. I am thinking that this whole digital thing just might be awesome. It seems that you can get 12 by 12 prints made to slip straight into a scrapbook, or you can upload each page (just like a picture) to a photo website and make a book with them. Oh, the possibilities!
*I'm of the old school, where I think you should learn how to take a good picture in the first place, instead of trying to add all the oomph after the fact via filters and cropping, etc...not that its all bad, but I think a lot of photography skills are being lost because its so easy to 'enhance' everything once you take the picture. End of soap box, over and out. ;)
Friday, March 11, 2011
Scrap Potholders


 I have a lot of food related fabric scraps so yesterday on a whim I decided to make some potholders. I just winged it and made them based on my specifications and I like how they turned out. I quilted them and used soft and natural batting for the insulation. They were really easy to make and used up random scraps of not only fabric, but batting, thread and bias tape. This project also introduced me to the walking foot and now in retrospect, I don't know how I sewed many things without it!
 Thursday, March 10, 2011
The Skirt That Does Not Love Me Back

I love this skirt. Alas, it does not love me back. This is the second time I made this pattern, and I **thought** I had a nice idea of what I would do better. Ha! I added a bit to give it a little more ease in the back, or at least I thought I did. In all honesty, I have no idea what happened. Somehow the same skirt, from the same pattern, turned out not to fit me and I really don't know where I went wrong. I am going to keep it around in hopes that it will work out. The fabric is from the fabulous yard sale we hit a few summers ago. A lady was selling boxes of brand new curtains that she had from her job. (She would photograph them for catalogs) She was selling them really cheap (like a buck or two each). This one is a purplish color...hard to describe and even harder to photograph realistically. It is a nice sturdy weight. The top of the curtain had a whole row of wooden toggle buttons that I cut off and saved for another project. The skirt buttons are vintage shell buttons from the stash that my Grandma and Aunt Phylis so generously gave me last spring. Seriously, I have such an obsession with buttons I could plan whole projects around them! I think a project like this is in my future.
Wednesday, March 9, 2011
Mom's Birthday - Dopp Kit and Jewelry Case
 For Christmas I made my mom the Amy Butler Blossom Bag out of this fabric. I thought it would be fun to make some matching travel bags to make a set. I used the wonderful Dopp Kit tutorial from here which I have used a couple of other times and really love. I also drafted the pattern for the jewelry case myself and I like the concept so much I think I will end up making one for my own traveling collection!
Tuesday, March 8, 2011
Amy Butler Anna Tunic Addition


One of my favorite workout stores puts little hidden features on the clothing. Something may have a hidden key pocket, be reversible etc. So I was thinking about my own closet and thought that if they can add secret things to their garments, so could I. That is was spurred me on to add what I am going to call the "Happy Hour" pocket to my Anna tunic which I originally posted here. It perfectly fits my phone, ID, CC and chapstick which is really all I need. You can't see it and nothing will fall out. I hate carrying around a big bag usually, so this was the perfect fix to lugging around too much stuff.
Friday, March 4, 2011
Bathroom Eye Chart

 A while ago I found some really cute, custom eye charts from Etsy but I refuse to pay $25 or more for something I could do myself. So finally, in between chores today I did some research and tried to make my own. I don't have photoshop so I quickly found that Microsoft Word just couldn't quite get it right. There were spacing issues that I couldn't correct and I needed a particular font that was not included in the standard program and I checked online and the type that I needed sold for a minimum of $30 and that's for 1 font only...I don't think so! Anyway, so I kept looking and ran across this blog that included a full tutorial and downloads to do this. If you have photoshop you can download the workable document to change however you want. Since I don't, I just used the original version which I really like anyway because the Beatles just know what to say :) Anyway, I hung it in my bathroom and I love the way it looks. I also love the fact that I paid zero dollars for it. I already had the frame and some really nice resume paper so with the help of my little printer, I was good to go!
Subscribe to:
Posts (Atom)